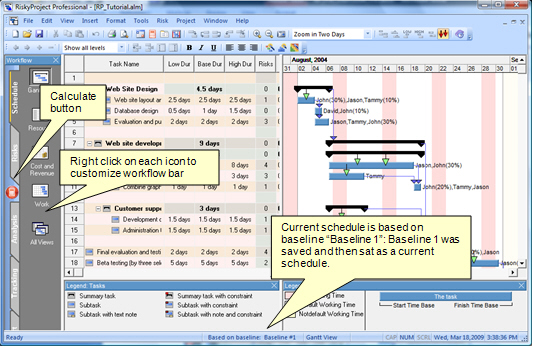
RiskyProject Interface
RiskyProject supports a multi-document interface. You can open and
close multiple project schedules during one session in RiskyProject.

Modifying the Workflow Bar
You may modify RiskyProject workflow by inserting and hiding views.
Any changes you make to the Workflow bar becomes the default for all
projects.
1. Right click on any button in workflow bar
2. Click on Hide Icon to hide selected icon
3. Click on Insert Icon… to insert unused icon to
the workflow bar. If the icon is already inserted to any of the tab,
it cannot be inserted again
4. Click on Set Default Icons if you wish to
restore default set of icons. By defaults, all icons are enabled
except for Local Risk Assignment (Tasks) and Local Risk Assignment
(Resources).
Toolbars
RiskyProject has several toolbars (Standard, Format, Views, Tools,
and Tasks). You can turn these toolbars off or on, or you may
customize them toolbars by adding or removing buttons.
Enabling/disabling or customizing toolbars
1. On the View menu, click Toolbars.
2. Click on a toolbar name to enable or disable it.
3. Choose Customize to modify a toolbar.
Application Look
You may change color and style of title bar, toolbars, and status
bar, as well as change theme for the datasheets. The theme is used
for any grid including grids inside dialog boxes.
Changing the application look
• On the Format menu, click Application
Look…
Formatting Gantt Bars
You may adjust shape and color of Gantt bar. You may do it for
specific tasks or for specific types of task: standard tasks,
summary tasks, milestones, etc.
Formatting Gantt Bars for All Tasks
• On the Format menu, click Bar
Styles…
Formatting Gantt Bars for Selected Tasks
1. Select task or a group of tasks
2. Right click on Task ID and choose Format
Bar…
See also
Formatting the Risk Matrix
Reports
|
